
Thread Support for Flipper Zero, Part 2: Setup
Development Environment and a Working Matter and Thread Application
Introduction
This is the second part in the series on Thread Support for the Flipper Zero. In it, I explore how I went about integrating the OpenThread Radio with the Flipper Zero and share some considerations, tips and pitfalls I encountered. In the first part, I outlined OpenThread and its relation to Matter. I also discussed why the Flipper Zero’s original microcontroller unit (MCU) is not usable, despite it supporting Thread.
Setting Up the Development Environment
To get started, install the required development tools and libraries, including the OpenThread repository, the Matter SDK, and the Flipper Zero firmware SDK. To configure your environment correctly, follow each project’s setup guides in this post. Additionally, ensure you have at least 100 GB of free space available, as these SDKs generate many build artifacts
Tools and Devices Needed to Create a New Flipper Zero GPIO Project
Devices
- A Flipper Zero
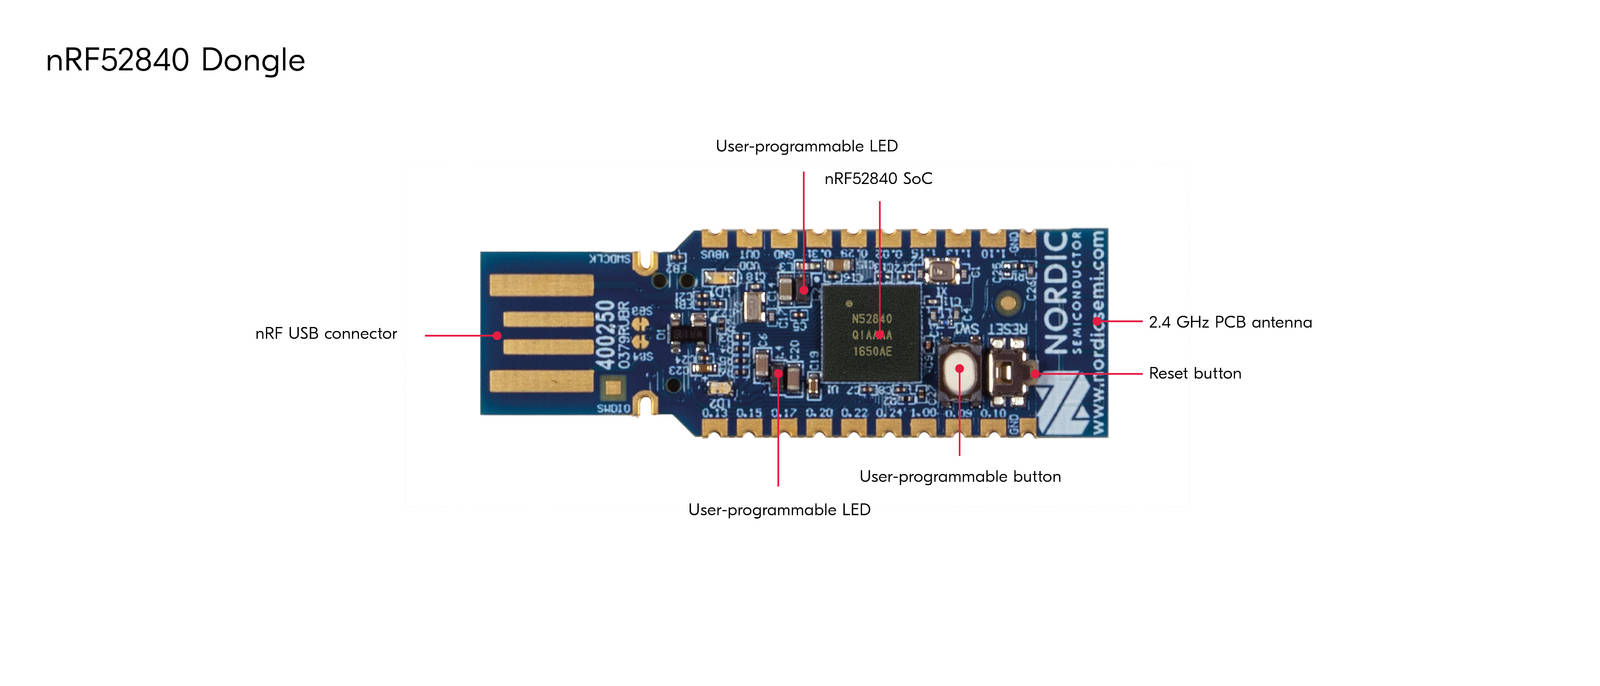
- One or more NRF52840 USB dongles and one NRF52840 DK for development (you can develop on the dongle as well, but you’ll need a debugger to work with, also, flashing is a bit painful – I killed multiple dongles with continuous reflash cycles).
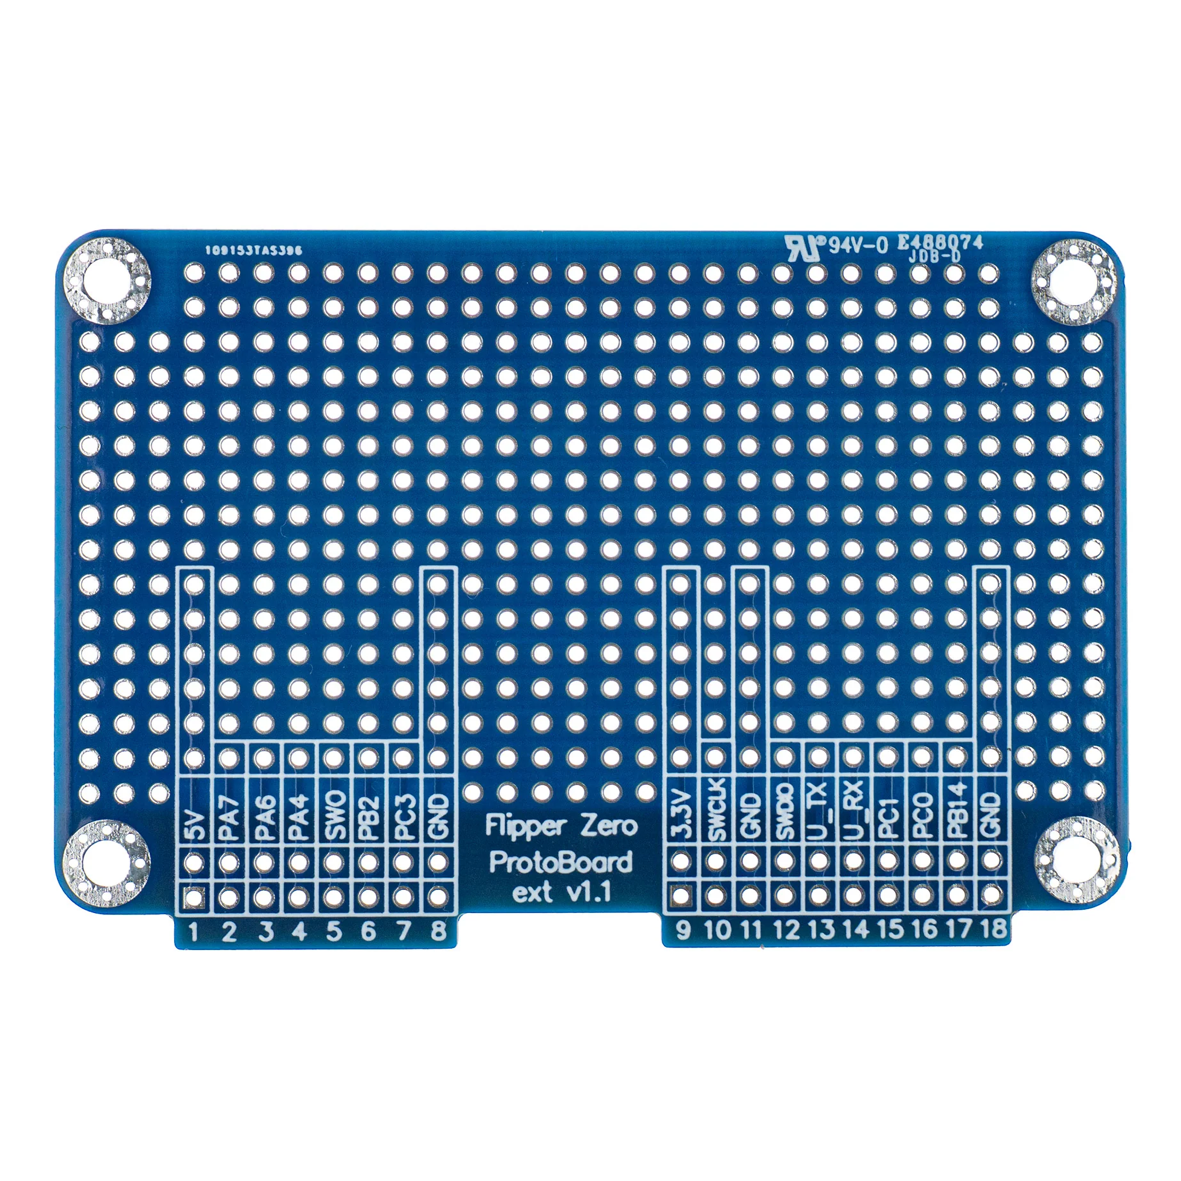
- Prototyping Boards for Flipper Zero and some solid AWG 22 cables
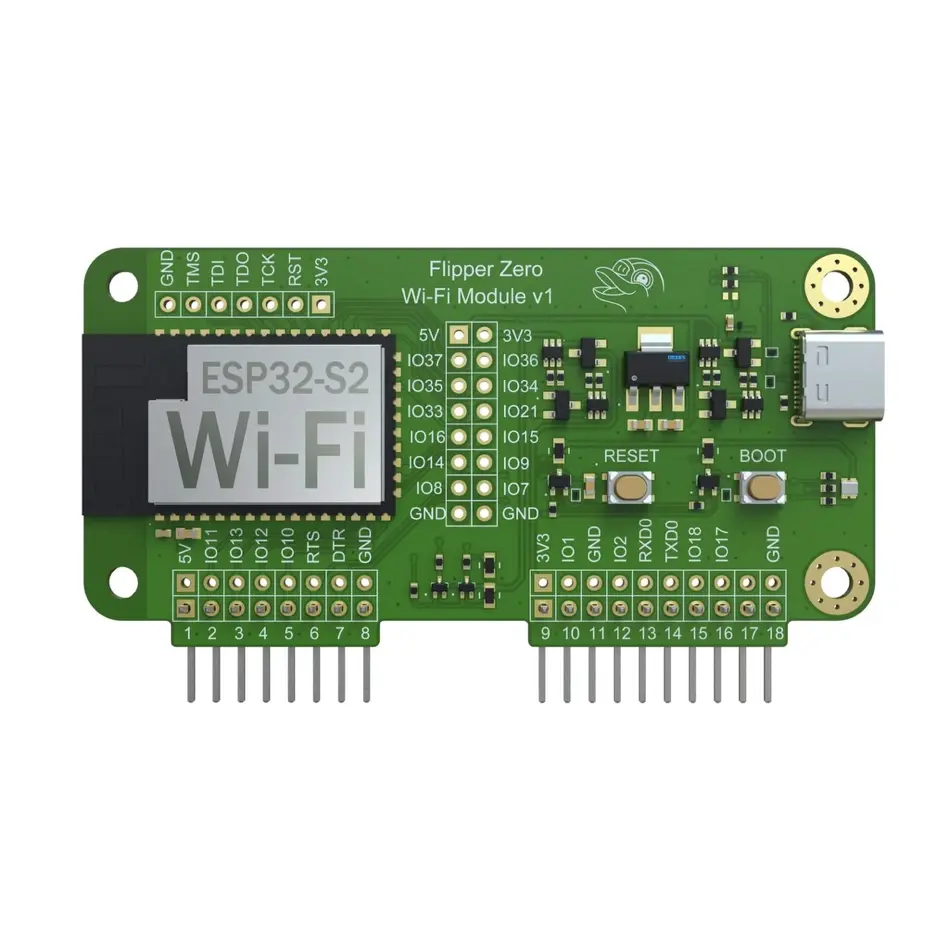
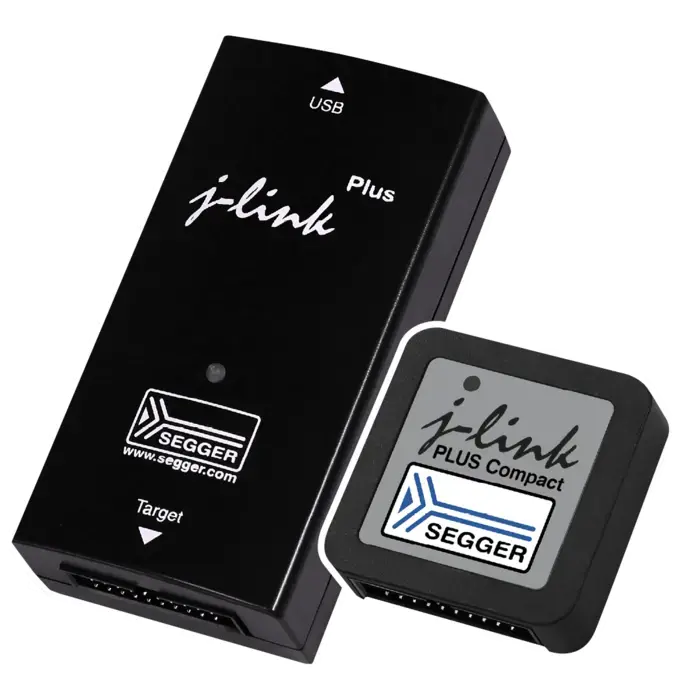
- ARM Debugger like WiFi Devboard for Flipper Zero or J-Link PLUS
- A soldering station
Software and SDKs
- Visual Studio Codium (Open Source version of VS Code) or Visual Studio Code
- nRF Plugin for VSCode
- Connectedhomeip SDK, aka. Matter SDK
- https://momentum-fw.dev and its build package, I used the ‘mntm-007’ release
- Flipper Build Tool or micro Flipper Build Tool
Key Tasks During the PoC Implementation
- Build a Thread-capable, fully programmable NRF 52840 SoC-based extension board. This chip is not part of the original Flipper Zero hardware platform. I wanted to reduce the development time, so I chose a well-known platform for my project.
- Build a PoC OpenThread firmware: An OpenThread sample shell application with USB access for testing.
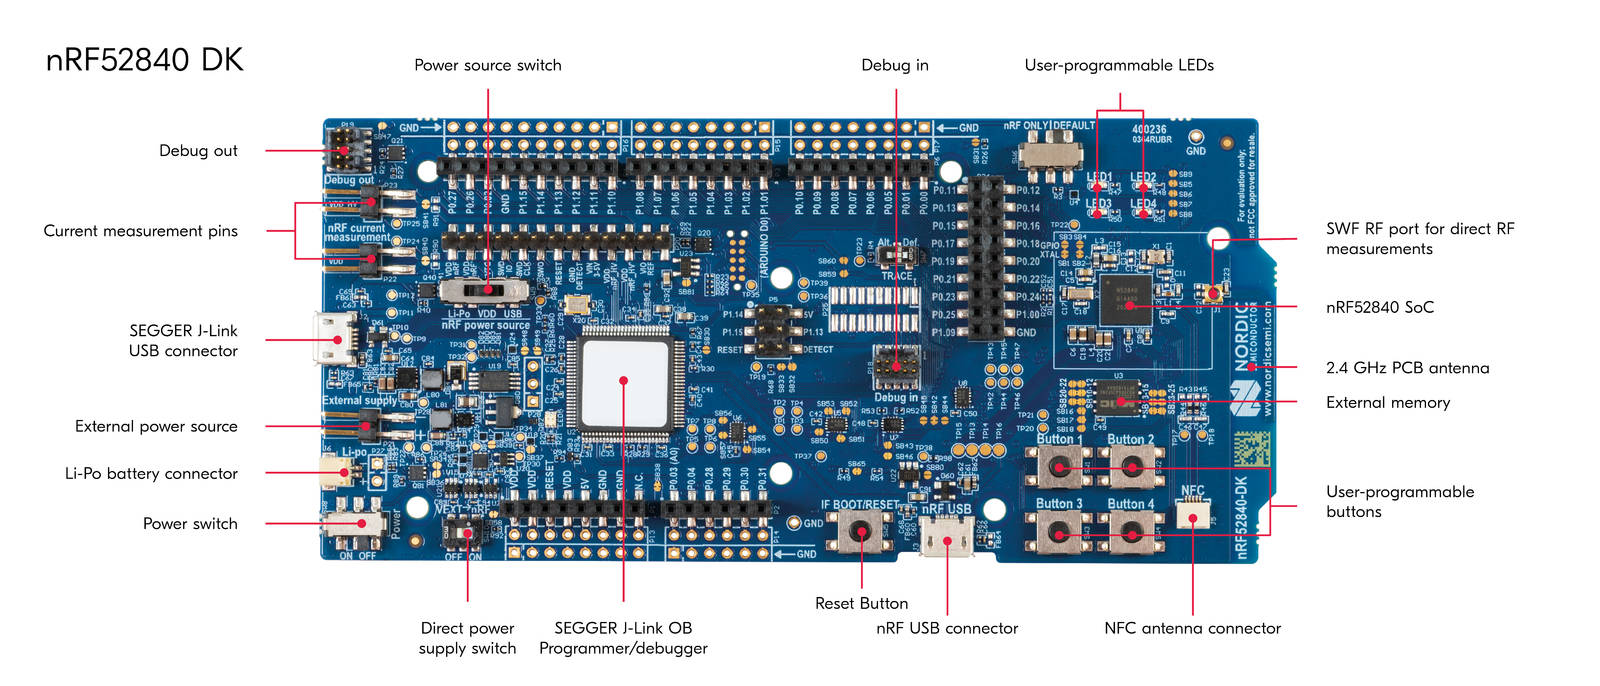
- Build a Matter firmware to demonstrate low-level access: I originally started the development by using the nRF52840 Development Kit with the help of the NRF Connect SDK. Nordic provides two devices for prototyping: the DK and the USB dongle. The Development Kit board is at least three times bigger than the Flipper Zero and is therefore unusable. With slight modifications in both the build process and the code, my application can be used on both devices.
- Solder the board and add some pins for debugging.
- Create a JS app for Flipper Zero to communicate with the SoC via UART.
- Configure the Thread Network: This includes network topology, device roles, and security settings. Use the OpenThread API to manage network operations and device interactions.
- Implementing the Matter Protocol: Integrate the Matter protocol support into the Flipper Zero firmware. This involves adding Matter-specific libraries and configuring communication interfaces to support Matter devices.
Guide for Crafting a New Extension Board
Step 0. Read the docs.
A slight modification is required on the nRF52840 dongle to support an externally regulated power supply instead of the internal one.
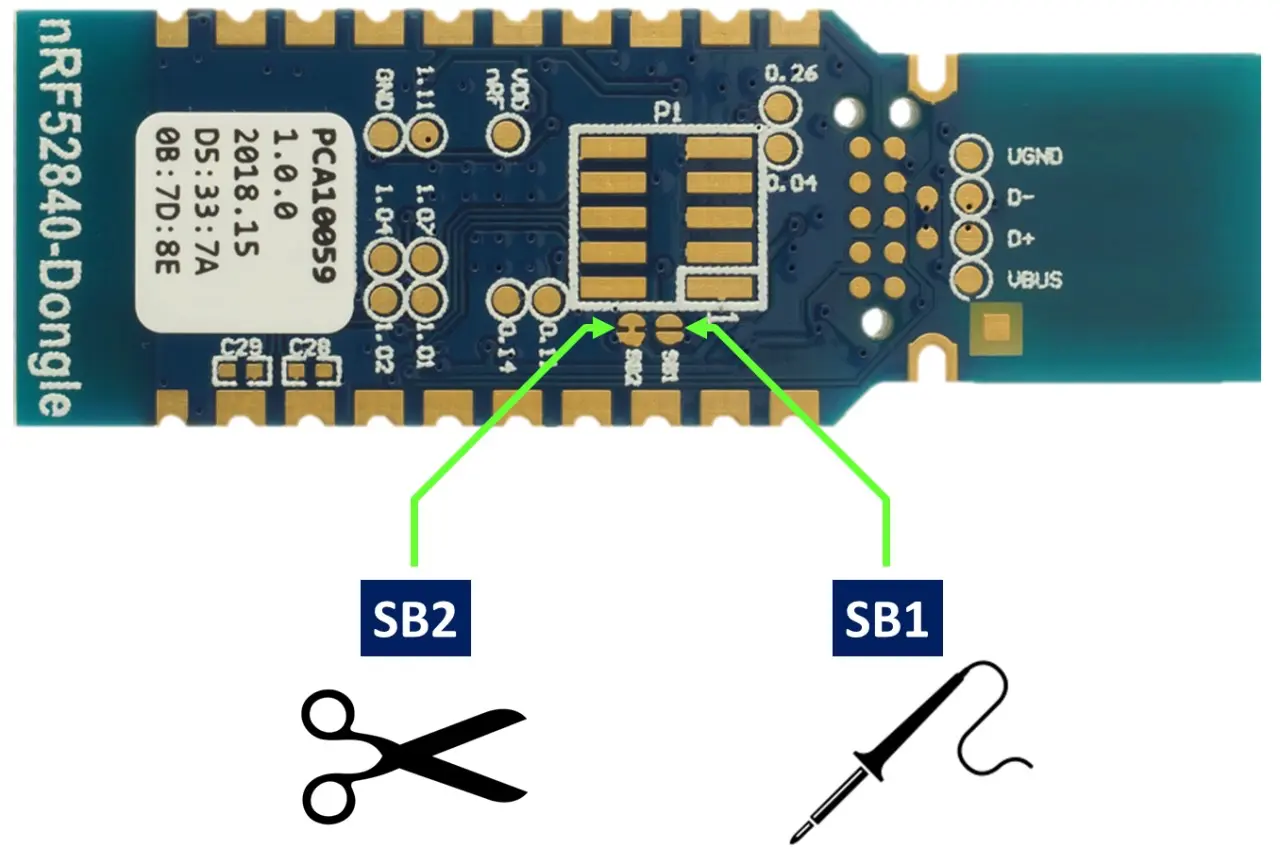
After this change the dongle can be powered via the VDD OUT pin, but it will no longer support the USB VBUS.
NOTE: Based on my test, the nRF SoC works perfectly powered by a Flipper Zero. A slight issue is that the hot swapping support is missing, and the SD card in the Flipper Zero might get corrupted upon removing the board. This also applies to the official Wi-Fi board, and a simple Flipper reboot should solve it.
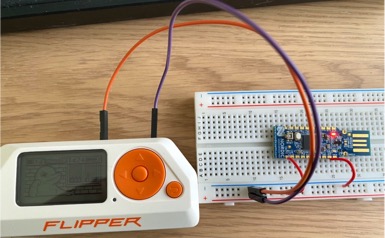
Step 1. Test the UART Communication with a Prototype
Step 2. Make It Prettier with a Breadboard and Continue Development
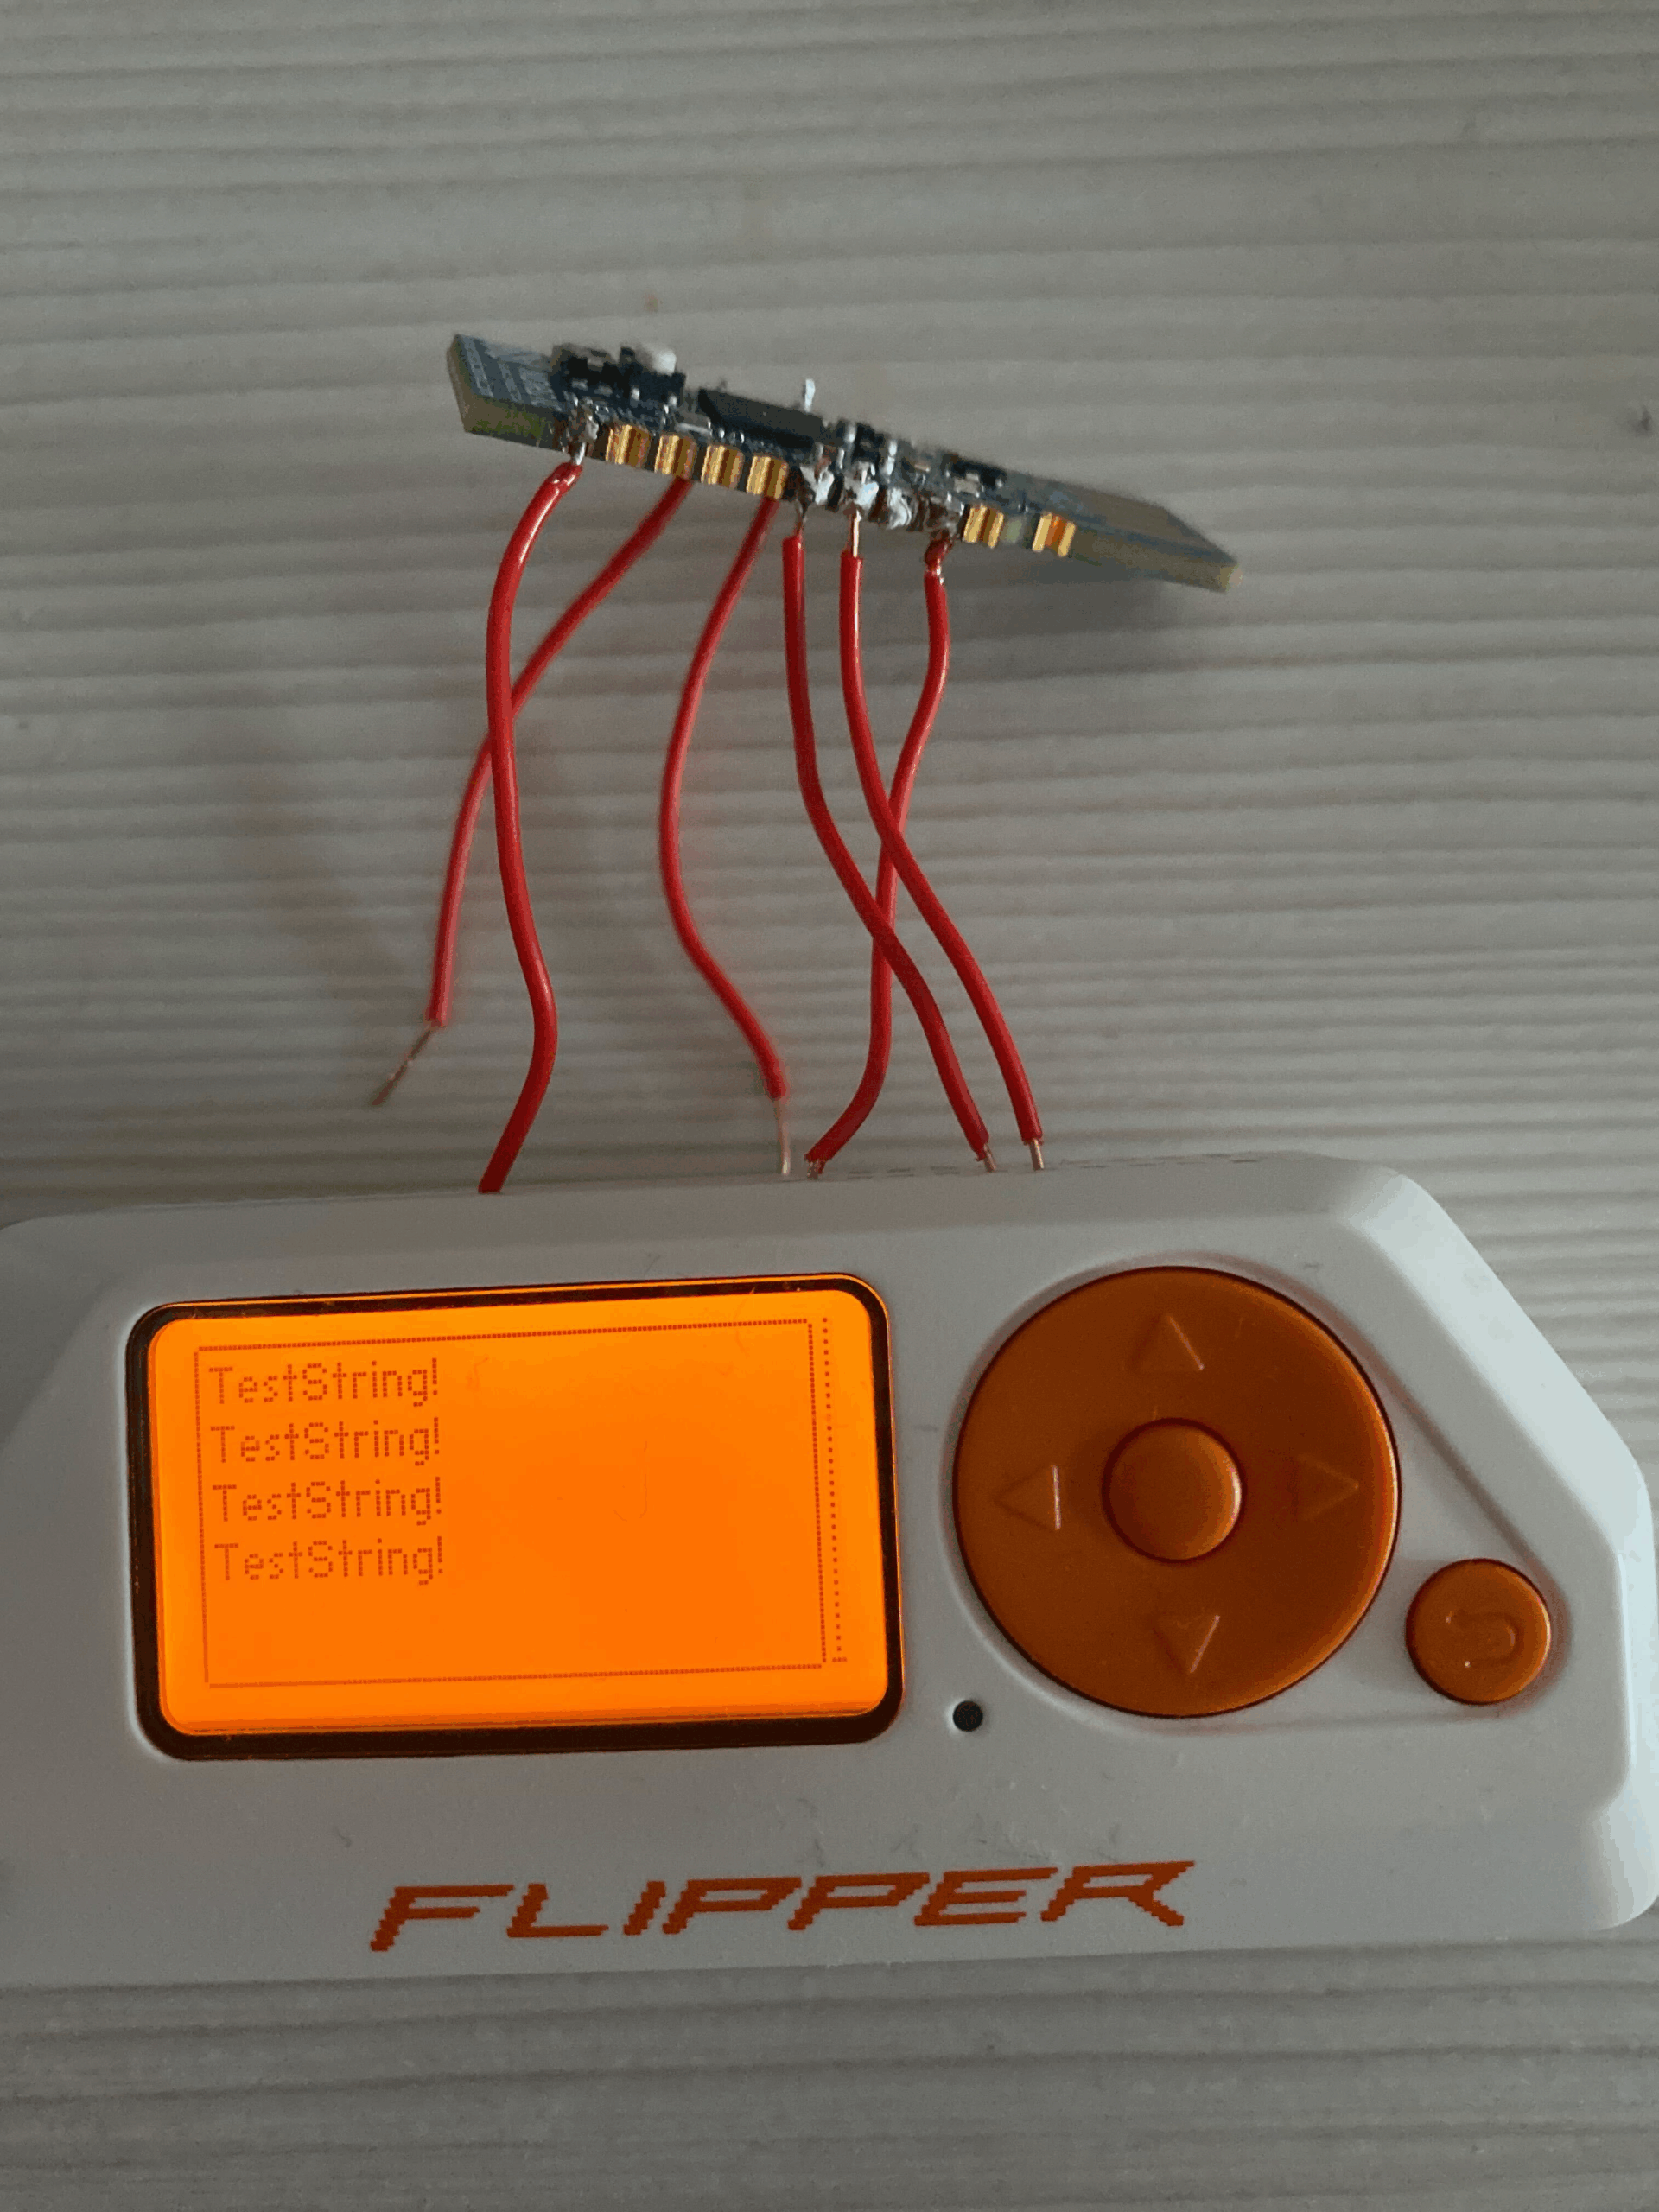
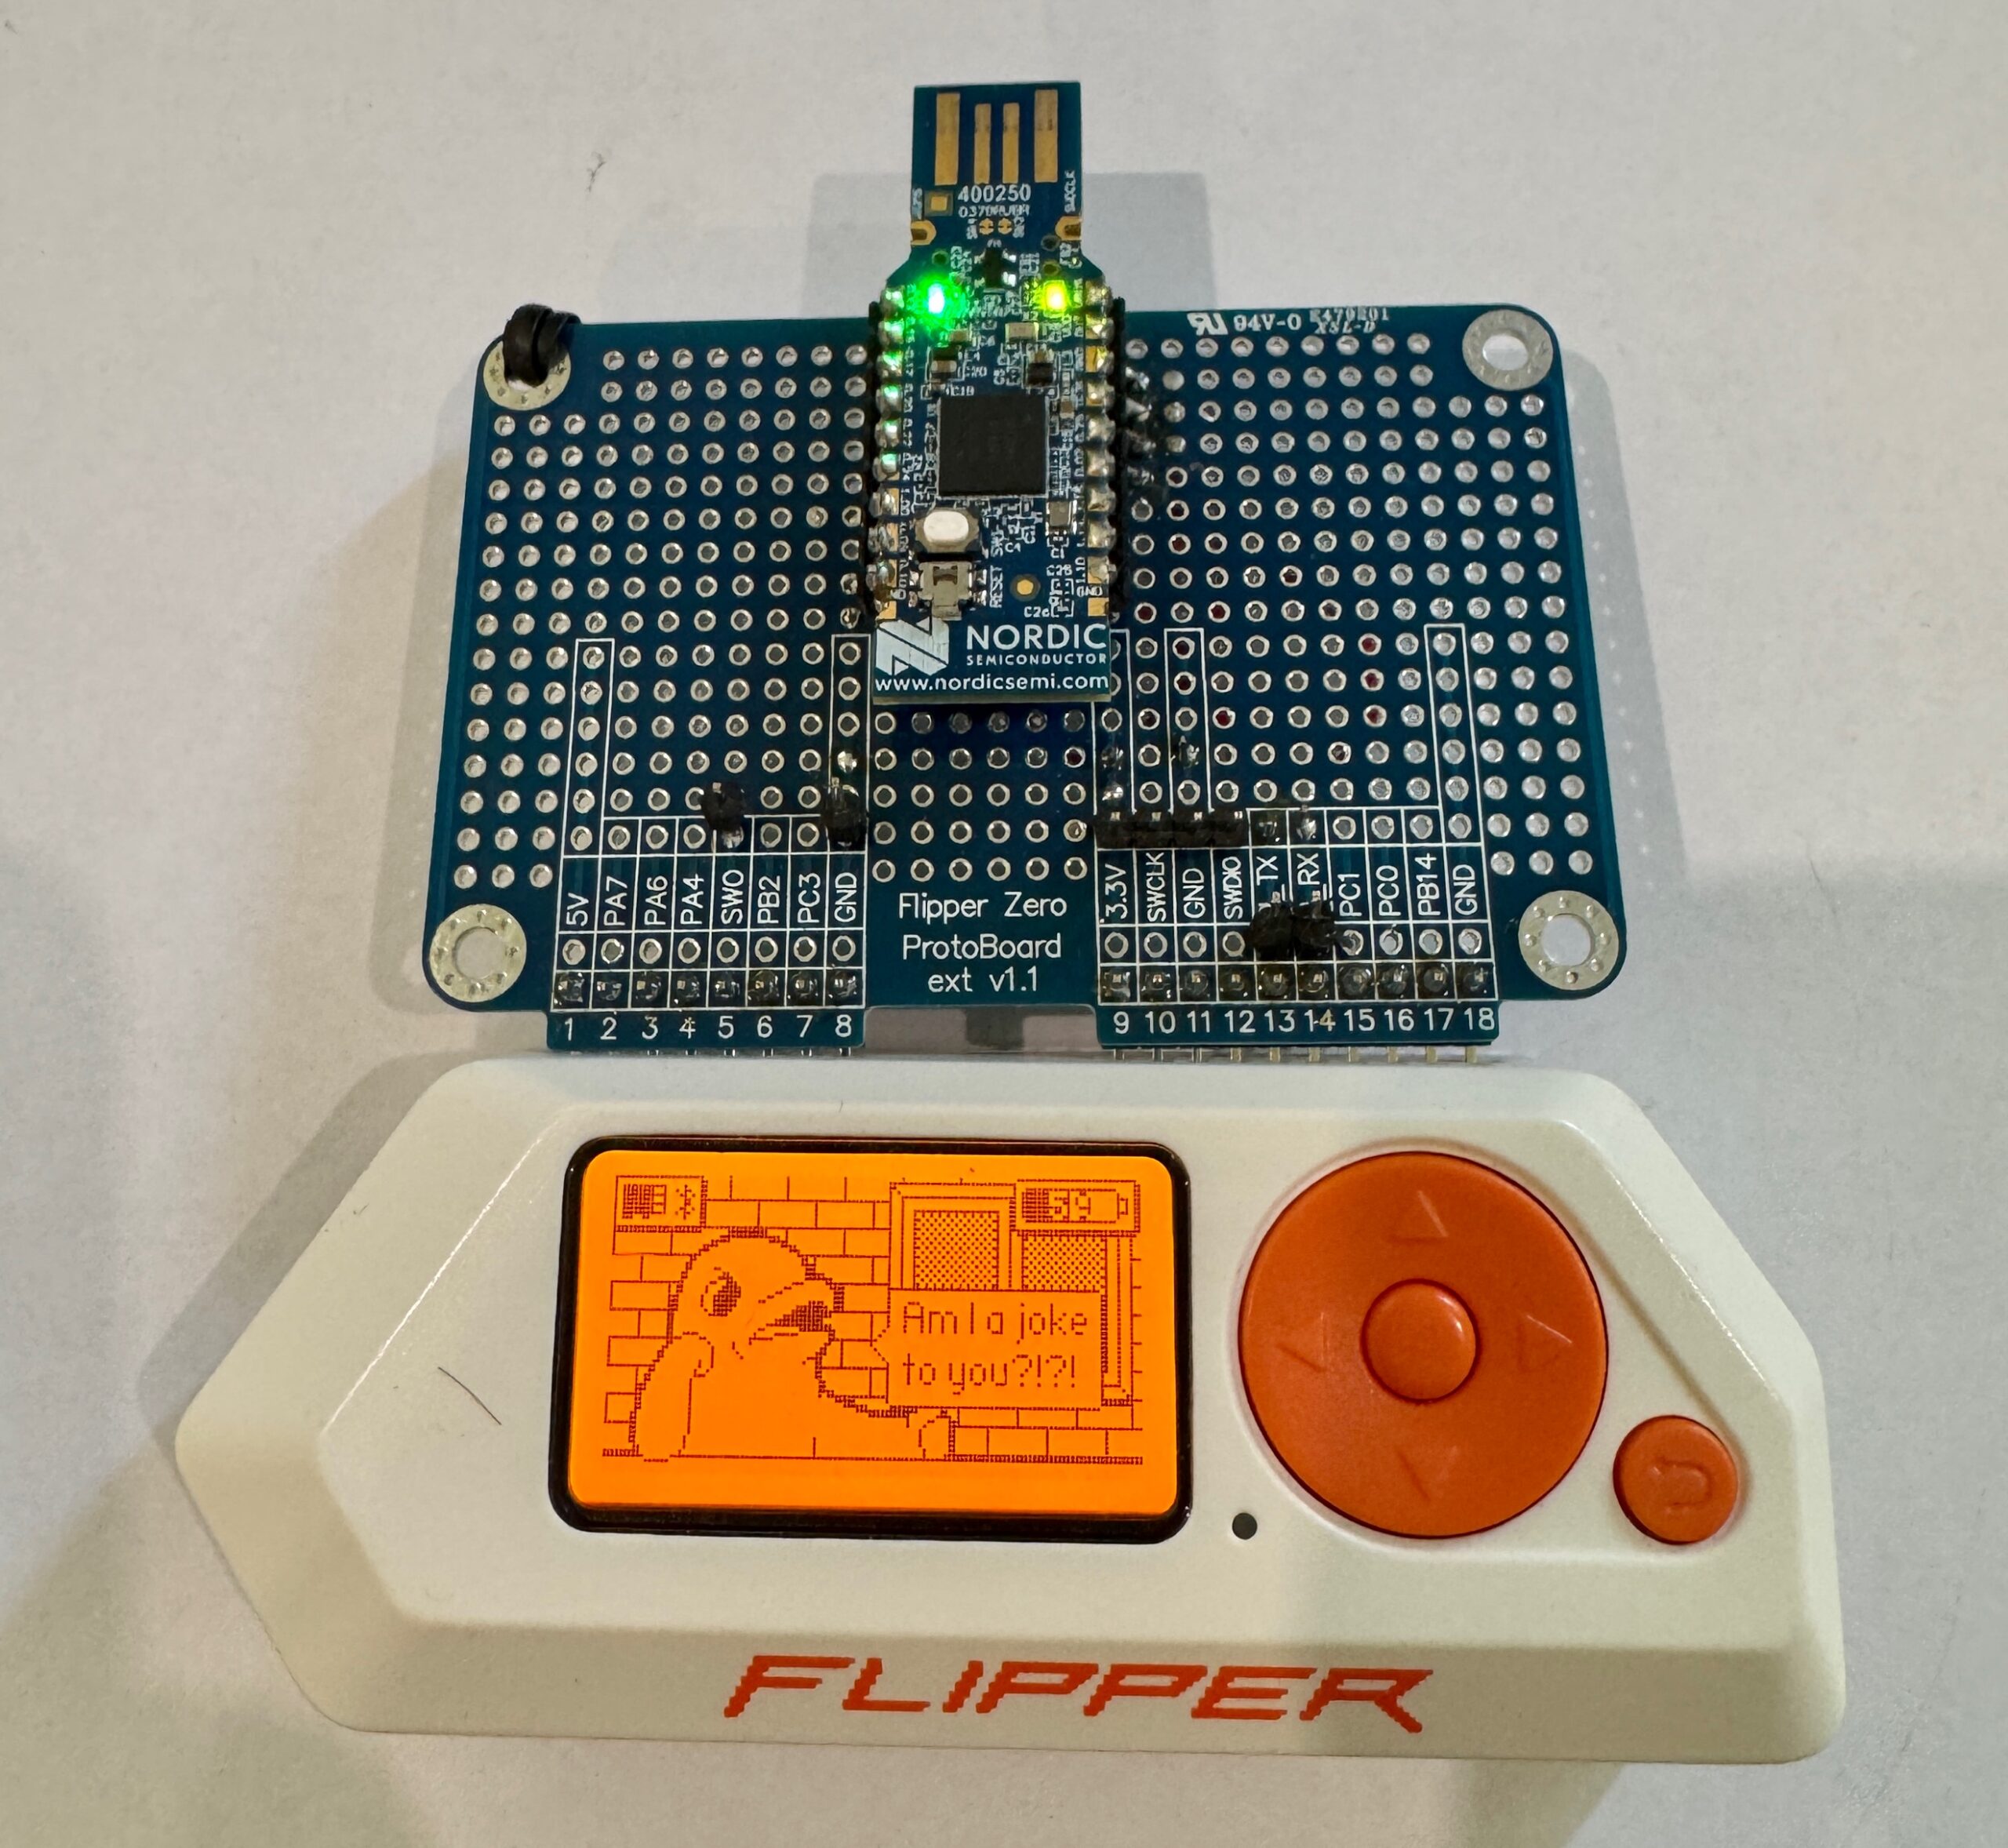
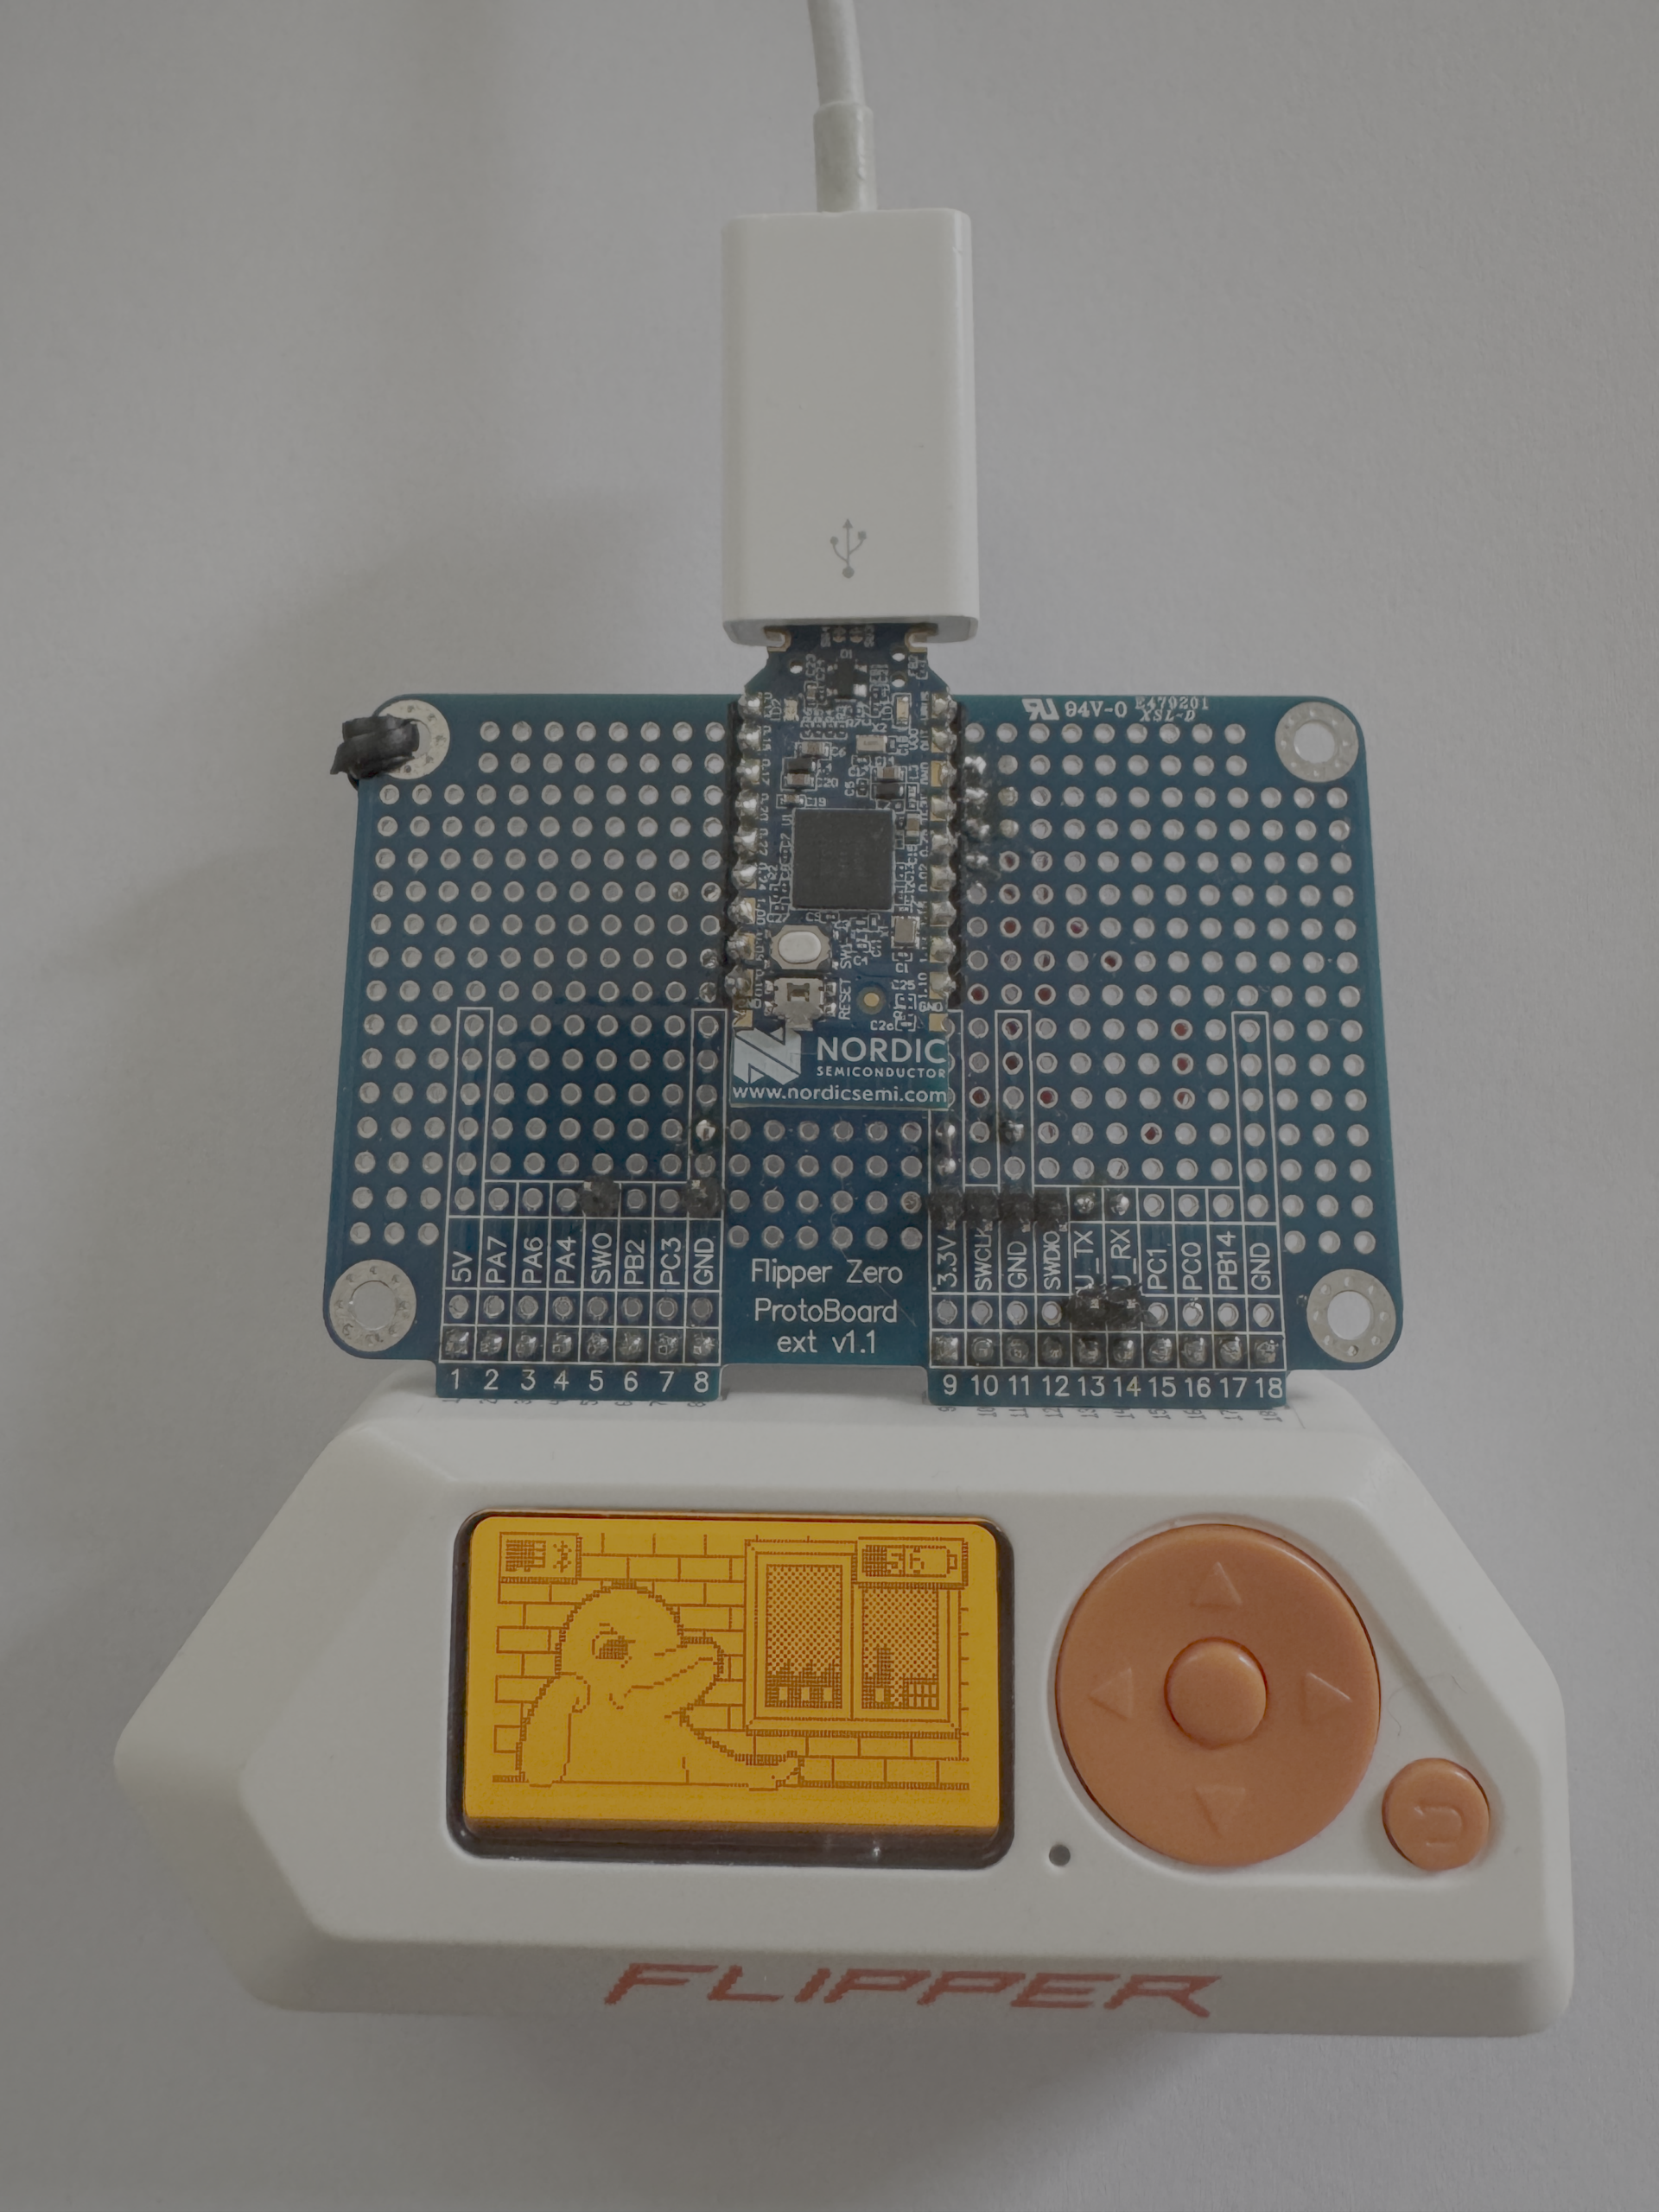
Step 3. Finish the PoC, Add Some Pins for Debugging, Make it Ugly Again
You can see the wiring in the following image:
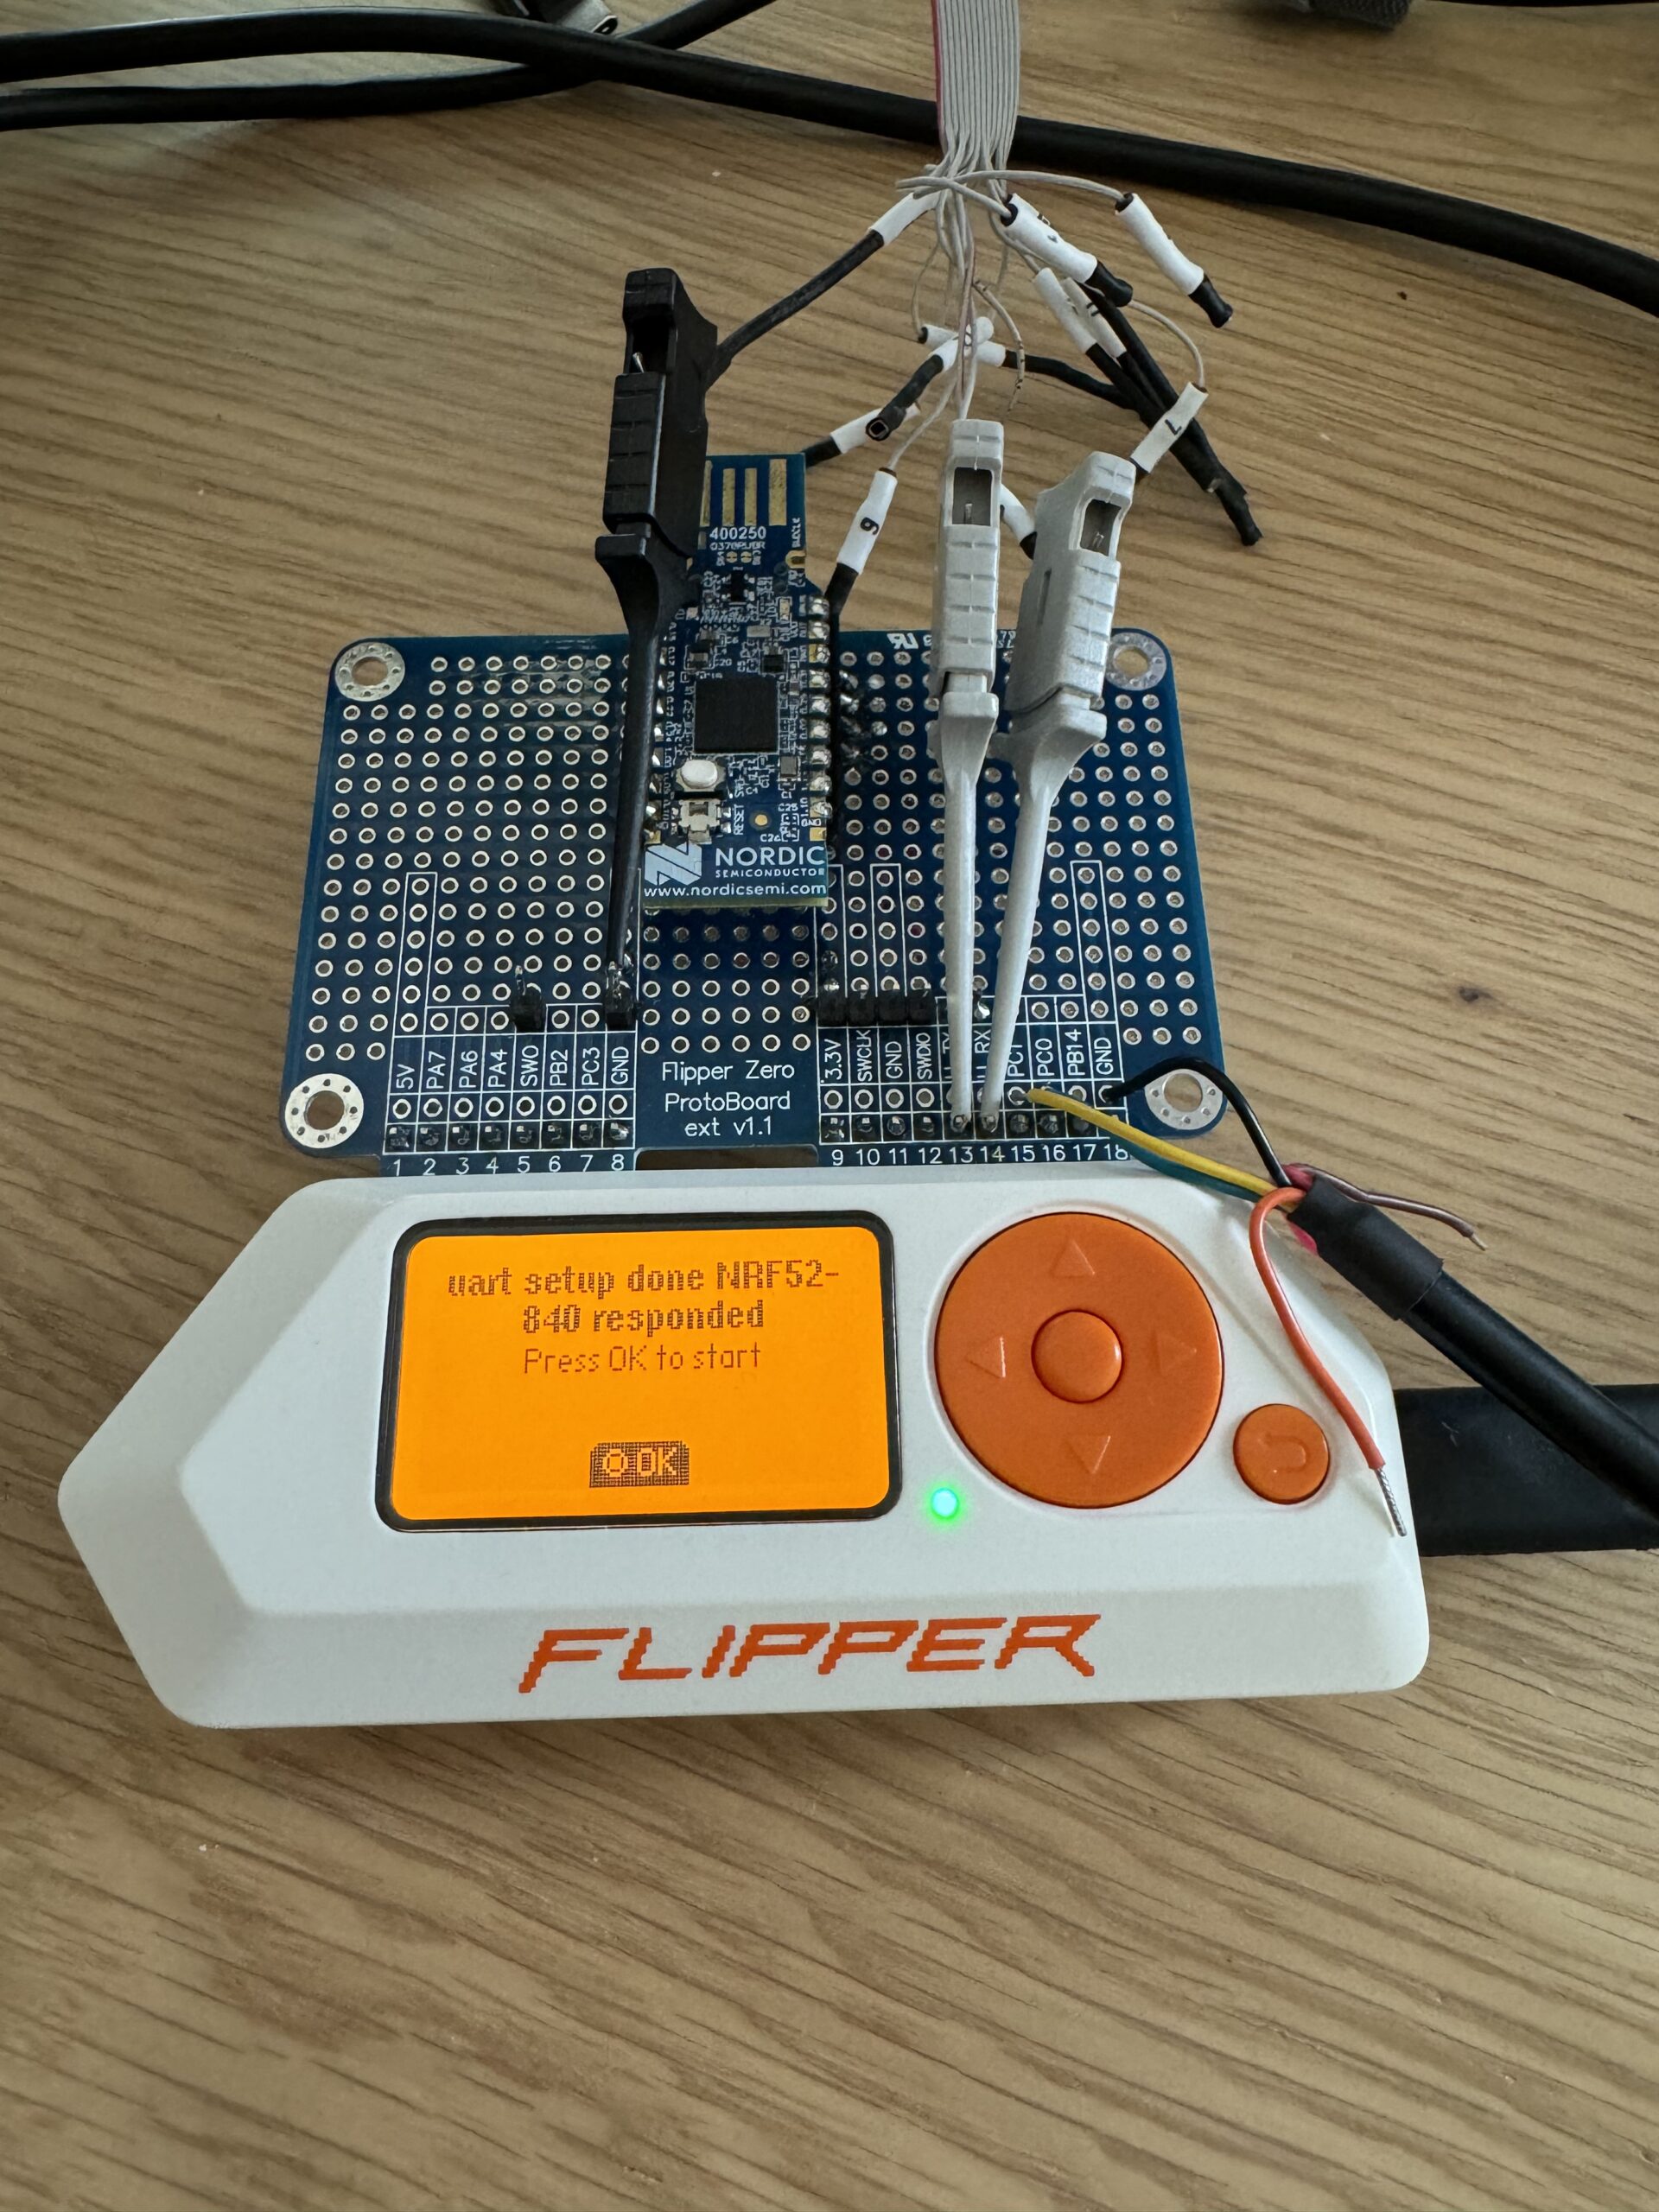
For a bare minimum PoC to work, connect GPIO 13,14, and GPIO 9, 11.
Guide to Setting Up a Firmware Development Environment
Setting Up Your Development Environment
The instructions assume an up-to-date macOS 15. Set up with brew.sh installed:
1. Flipper build setup
# Install the Simple TTY terminal I/O application
brew install tio

# Install Visual Studio Code
brew install visual-studio-code

# Install the compact tool for building and debugging applications for Flipper Zero
brew install ufbt

# Use momentum fw and your toolchain
ufbt update -b mntm-007 --index-url=https://up.momentum-fw.dev/firmware/directory.json

# Clone the current Momentum-Firmware as well
git clone https://github.com/Next-Flip/Momentum-Firmware.git
2. nRF build setup
Use the command line to install the SDK for the NRF chip and the corresponding toolchain.
NOTE: For the PoC build, the only Nordic version that works without issues is v2.8.0. Others generated strange issues with cmake and missing function calls.
brew install nrfutil
nrfutil sdk-manager install v2.8.0
nrfutil toolchain-manager install --ncs-version v2.8.0
nrfutil toolchain-manager env --ncs-version v2.8.0 --as-script > ~/bin/nrf_2.8.0_env.sh
3. Matter SDK build setup
Building Matter SDK-based firmware might fail on the first or second attempt. If the issues persist, do a full clean and restart. The connectedhomeip SDK supports many different platforms and seems broken when used on uncommon ones. The nrf52840 dongle appears to be one of the least used. The light-app sample has been broken since February 2023, while the nrf52840dk board seems to mostly work without issues.
First, check out the source code:
git clone https://github.com/project-chip/connectedhomeip
cd connectedhomeip
The latest version of the Matter SDK is under heavy development, finding a working git commit is like finding a needle in a haystack. During my tests, I found the following commit as a reasonably up-to-date and buildable solution:
git checkout 7c1d6f753b7127fa71f9962ca86de1f8761a5563
This small patch fixes the build issues, removes the Matter factory data generation, and provides OTA support. For our PoC, it’s a working solution.
git apply << EOF
diff --git a/examples/all-clusters-app/nrfconnect/sysbuild_dfu.conf b/examples/all-clusters-app/nrfconnect/sysbuild_dfu.conf
index edaaa8394e..535739076a 100644
--- a/examples/all-clusters-app/nrfconnect/sysbuild_dfu.conf
+++ b/examples/all-clusters-app/nrfconnect/sysbuild_dfu.conf
@@ -14,7 +14,4 @@
# limitations under the License.
#

-SB_CONFIG_MATTER=y
-SB_CONFIG_MATTER_OTA=y
SB_CONFIG_BOOTLOADER_MCUBOOT=y
-SB_CONFIG_MATTER_FACTORY_DATA_GENERATE=y
EOF
The next step is to set up the missing submodule components. This approach only checks out what we need and not the whole repo.
export ZEPHYR_BASE=/opt/nordic/ncs/v2.8.0/zephyr

# update mandatory modules
python3 scripts/checkout_submodules.py --shallow --platform darwin
python3 scripts/checkout_submodules.py --shallow --platform nrfconnect
source ./scripts/bootstrap.sh
4. Install the Segger debugger and JLink
brew install --cask segger-jlink
brew install --cask segger-ozone
5. Setup Flipper Zero
- Install momentum-fw on your development Flipper Zero. Ensure Flipper Zero runs the mntm-007 firmware.
- Install the firmware using the self-update package and update the Wi-Fi dev board firmware, if necessary.
ufbt flash_usb
#
ufbt devboard_flash
ufbt bootsrap
At this point, we have all the necessary things to do something.
Let’s Start Developing
- https://github.com/flipperdevices/flipperzero-ufbt
- https://developer.flipper.net/flipperzero/doxygen/vscode.html
Flipper Zero
- Install momentum-fw to your development Flipper Zero: Ensure the Flipper Zero runs the mntm-007 firmware. You can update it using the Flipper Zero mobile app or desktop software.
# Install firmware using the self-update package
ufbt flash_usb

# Update the Wi-Fi dev board, if necessary
ufbt devboard_flash
ufbt bootsrap
- Install development tools: You’ll need a text editor (like VS Code), the Flipper Zero SDK, and Python for scripting.
- Connect to GPIO pins for testing: You can connect external components (like LEDs, sensors, etc.).
- Deploy and run the code
- Upload the Script: Transfer the script to your Flipper Zero using the mobile app or desktop software.
- Run the Script: Execute the script from the Flipper Zero interface.
In our previous blog post, we ended with the Flipper Zero SDK.
Implementing PoC Matter Support
Luckily for us, the Matter team did an excellent job providing examples. Blinking an LED is the best way to start a HelloWorld project in IoT.
In the terminal, connect to the connectedhomeip, source the nrf env, and the activate scripts.
export ZEPHYR_BASE=/opt/nordic/ncs/v2.8.0/zephyr
# activate your NRF toolchain to be usable inside your Matter build
source ~/bin/nrf_2.8.0_env.sh

# activate Mater SDK
source ./scripts/activate.sh

# based on your target board
# export BUILD_TARGET=”nrf52840dk/nrf52840”
# or
# export BUILD_TARGET=”nrf52840dongle/nrf52840”

cd examples/lighting-app/nrfconnect
west config build.board $BUILD_TARGET
west build

# Press the reset button to restart in bootloader mode
# when the dongle blinks red and the device file with prefix appears /dev/cu.usbmodem
export DEV_FILE=$(ls -1 /dev/cu.usbmodem[CD]* |grep -v flip|head -n 1)

nrfutil pkg generate --hw-version 52 --sd-req 0x00 --application-version 1 --application ./build/nrfconnect/zephyr/zephyr.hex ./build/nrfconnect/zephyr/zephyr_dfu.zip
nrfutil dfu usb-serial -pkg ./build/nrfconnect/zephyr/zephyr_dfu.zip -p $DEV_FILE
NOTE: The Matter application will not boot on the SoC until something is connected to the USB UART port.
We can use the tio application to interact with our light sample:
tio /dev/cu.usbmodem103
Connected to /dev/cu.usbmodem103
*** Booting nRF Connect SDK v2.8.0-a2386bfc8401 ***
*** Using Zephyr OS v3.7.99-0bc3393fb112 ***
[00:00:00.024,169] <dbg> chip: LogV: [DL]Boot reason: 6
[00:00:00.825,622] <inf> app: Init CHIP stack
[00:00:00.833,740] <inf> chip: [DL]BLE address: C0:57:71:8F:88:0C
[00:00:00.839,019] <inf> chip: [DL]OpenThread started: OK
[00:00:00.839,447] <inf> chip: [DL]Setting OpenThread device type to ROUTER
[00:00:00.839,721] <inf> chip: [SVR]Subscription persistence not supported
[00:00:00.839,782] <inf> chip: [SVR]Server initializing...
[00:00:00.839,965] <inf> chip: [TS]Last Known Good Time: [unknown]
[00:00:00.840,179] <inf> chip: [TS]Setting Last Known Good Time to firmware build time 2023-10-14T01:16:48
[00:00:00.844,451] <dbg> chip: LogV: [IN]UDP::Init bind&listen port=5540
[00:00:00.844,635] <err> chip: [IN]IPV6_PKTINFO failed: 109
[00:00:00.844,848] <dbg> chip: LogV: [IN]UDP::Init bound to port=5540
[00:00:00.844,940] <dbg> chip: LogV: [IN]BLEBase::Init - setting/overriding transport
[00:00:00.845,001] <dbg> chip: LogV: [IN]TransportMgr initialized
[00:00:00.852,722] <dbg> chip: LogV: [DL]Using Thread extended MAC for hostname.
[00:00:00.863,952] <err> chip: [ZCL]DeviceInfoProvider is not registered
[00:00:00.874,572] <dbg> chip: LogV: [IN]SecureSession[0x200031a8]: Allocated Type:1 LSID:56842
[00:00:00.874,725] <dbg> chip: LogV: [DL]CHIPoBLE advertising set to on
[00:00:00.874,847] <inf> chip: [DIS]Updating services using commissioning mode 1
[00:00:00.874,969] <err> chip: [DIS]Failed to remove advertised services: 3
[00:00:00.875,122] <dbg> chip: LogV: [DL]Using Thread extended MAC for hostname.
[00:00:00.875,640] <inf> chip: [DIS]Advertise commission parameter vendorID=65521 productID=32773 discriminator=3840/15 cm=1 cp=0
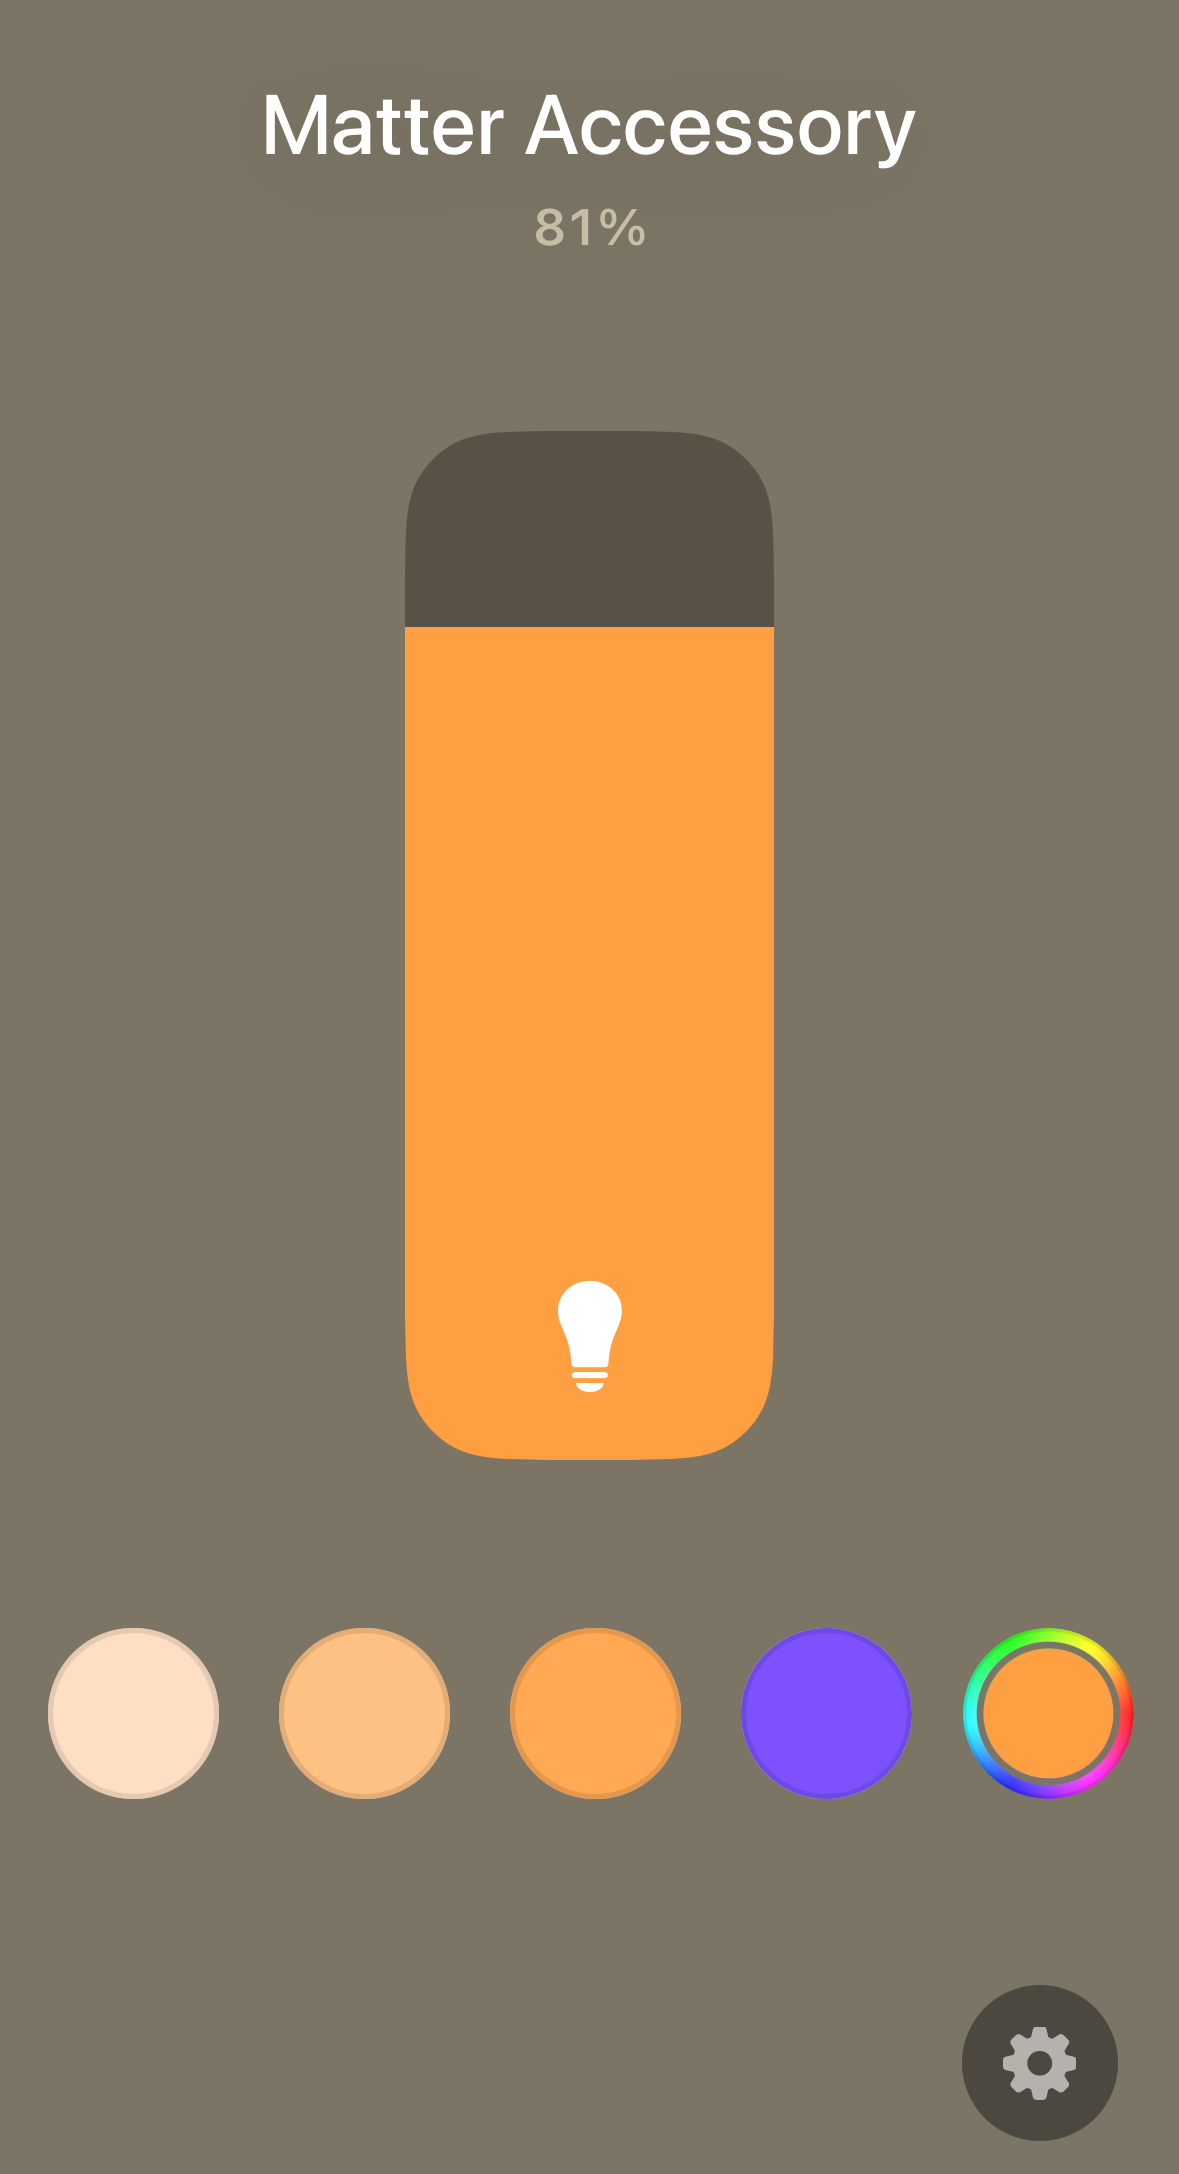
The next section of the log contains the onboarding information that can be used with Google Home or Apple Home
[00:00:24.791,595] <inf> chip: [DL] Serial Number: 11223344556677889900
[00:00:24.791,717] <inf> chip: [DL] Vendor Id: 65521 (0xFFF1)
[00:00:24.791,809] <inf> chip: [DL] Product Id: 32773 (0x8005)
[00:00:24.791,900] <inf> chip: [DL] Product Name: not-specified
[00:00:24.792,449] <inf> chip: [DL] Hardware Version: 0
[00:00:24.793,029] <inf> chip: [DL] Setup Pin Code (0 for UNKNOWN/ERROR): 20202021
[00:00:24.793,609] <inf> chip: [DL] Setup Discriminator (0xFFFF for UNKNOWN/ERROR): 3840 (0xF00)
[00:00:24.794,158] <inf> chip: [DL] Manufacturing Date: (not set)
[00:00:24.794,281] <inf> chip: [DL] Device Type: 65535 (0xFFFF)
[00:00:24.795,349] <inf> chip: [SVR]SetupQRCode: [MT:6FCJ142C00KA0648G00]
[00:00:24.795,501] <inf> chip: [SVR]Copy/paste the below URL in a browser to see the QR Code:
[00:00:24.795,623] <inf> chip: [SVR]https://project-chip.github.io/connectedhomeip/qrcode.html?data=MT%3A6FCJ142C00KA0648G00
[00:00:24.795,806] <inf> chip: [SVR]Manual pairing code: [34970112332]
[00:00:24.796,813] <inf> chip: [DL]CHIP task running
[00:00:24.799,194] <inf> chip: [DL]CHIPoBLE advertising started
https://project-chip.github.io/connectedhomeip/qrcode.html?data=MT%3A6FCJ142C00KA0648G00

Implementing Thread PoC support
The nRF SDK contains a native Zephyry-based sample application we can use as a CLI to access OpenThread APIs and functions. The same level of access can be achieved with modification of other applications, but this is best for our use case.
Let’s set the target board and use our previously configured Nordic v2.8.0 SDK’s openThread CLI app.
# based on your target board
# export BUILD_TARGET=”nrf52840dk/nrf52840”
# or
# export BUILD_TARGET=”nrf52840dongle/nrf52840”

# press the reset button to restart in bootloader mode
export DEV_FILE=$(ls -1 /dev/cu.usbmodem[DC]* |grep -v flip|head -n 1)

cd /opt/nordic/ncs/v2.8.0
west build -p continually -b nrf52840dongle_nrf52840 nrf/samples/openthread/cli

nrfutil pkg generate --hw-version 52 --sd-req 0x00 --application-version 1 --application build/cli/zephyr/zephyr.hex build/cli/zephyr/DFU_package.zip
nrfutil dfu usb-serial -pkg build/cli/zephyr/DFU_package.zip -p $DEV_FILE
After flashing the firmware on our SoC, let’s scan the Thread networks around us:
tio /dev/tty.usbmodem????
[17:56:33.249] tio 3.9
[17:56:33.250] Press ctrl-t q to quit
[17:56:33.252] Connected to /dev/tty.usbmodem2101
*** Booting nRF Connect SDK v2.9.0-7787b2649840 ***
*** Using Zephyr OS v3.7.99-1f8f3dc29142 ***

uart:~$uart:~$ ot scan
| PAN | MAC Address | Ch | dBm | LQI |
+------+------------------+----+-----+-----+
| e948 | b607cebacaf14b2c | 25 | -46 | 192 |
| e948 | 767d9c53c6dfb1bd | 25 | -43 | 196 |
Done
To Sum Up
We have a working development environment, a Matter and Thread application, which provides us with low-level access and logs.
The next part of the series demonstrates how to modify the application to communicate via UART, provide a sample mJS application that runs on flipper and interacts with our firmware running on top of the nRF SoC.
Read part three and follow CUJO AI Labs on BlueSky: @cujoailabs.bsky.social