
UPX Anti-Unpacking Techniques in IoT Malware

Attackers are always at the forefront of inventing new techniques to stay covert. It comes by no surprise that their tradecraft is also subject to continuous improvement and development. One interesting facet of their tactics is how they are utilizing binary packing. Packing plays an important part in evasion and covert deploying of malicious binaries:
- It helps attackers to avoid endpoint anti-virus detection software when deploying the malicious binary to the target device
- Packing reduces the size of the binary on disk and in transit significantly: this comes handy, when low visibility is required from the attacker’s side or for instance, an exploit kit requires small binaries to be delivered, otherwise it would break, and crooks would not be able to disseminate malicious binaries properly
- Packing also enables to hide plain-text strings seen normally in the binary, throttling the analysis that defenders may do on the binary
A Primer on Packing
There are commonly four packer types that we distinguish, but oftentimes the boundary between these might be thin. These are:
- Compressors: greatly reduces the size of the binary
- Cryptors: using cryptographic algorithm to obfuscate the contents of the binary
- Protectors: used widely as copyright protection, for ex.: Virtual machine (VM)-based digital rights and copy protection
- Installer: binary wrapped around an installer for easy installment
There are many ways of identifying packed binaries:
- Examining visual representation of the binary: to explore similarities by visualizing certain byte patterns of the binary; other application of it is to spot important structures in the binary or to analyze given file formats in order to better understand it
- Non-standard section names
- Section with both Writable and Execute permissions may be a possible sign of a packer
- Address of entry point somewhere else, then in the first section
- Presence of certain function calls
- Increased entropy: taking the frequency of each byte value that are present in each block or section, then applying a certain entropy formula to calculate entropy scores for given sections: higher entropy scores may indicate the presence of encryption or packing
- Very few imports and very few recognizable strings
- Using file identification tools (file, trid, etc..)
Unpacking mechanism
A simple routine stub code is embedded into the now packed binary, that also acts as the entry point. As it starts running, it will allocate a new memory region in which it unpacks the original code. Then the program code jumps to the Original Entry Point (OEP) and continues with the execution of the original, unpacked program.
UPX
One of most known packers is UPX. It is an open-source implementation of an advanced file compressor, supporting lots of executable types, Linux and Windows too. Over the years, UPX has been judged both as a legitimate and a gray zone tool, as both innocent and malicious programs like to use and abuse it commonly.
UPX has been abused in a few different ways for many years:
- Use of Vanilla UPX: malware developers just take the original UPX compressor and apply it to their malware. Easy to unpack, either automatically or manually.
- Use of Vanilla UPX, then the packed binary is hex modified: from an attacker perspective, the goal is to break automatic unpacking by modifying some hex bytes. This will break the automatic upx –d unpacking method. Some of the most common modifications include:
- Rewriting the UPX! magic headers
- ELF magic bytes are modified
- Copyright string is modified
- Section header names are modified
- Extra junk bytes added throughout the binary
- Custom UPX: since UPX is open source, anyone can go and look at its source code on Github and modify certain methods or re-write complete functions. Once the custom UPX program code is compiled, and then applied to a malicious binary, there is no way to get a full picture and understand its custom functions or modified routines right off the bat. Our only resort to understand the mechanism of the custom packing is to manually reverse engineer it.
UPX Header Structures Abused
Since it was not an easy task to find abused, malicious packed binaries to every plot, we created skeleton, packed programs, that will raise different error messages on different abuse scenarios, to try to emulate all exceptions:
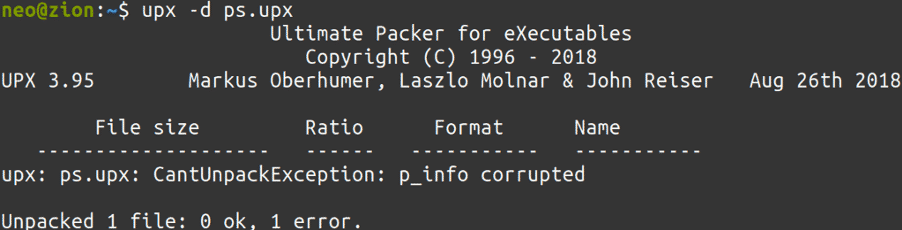
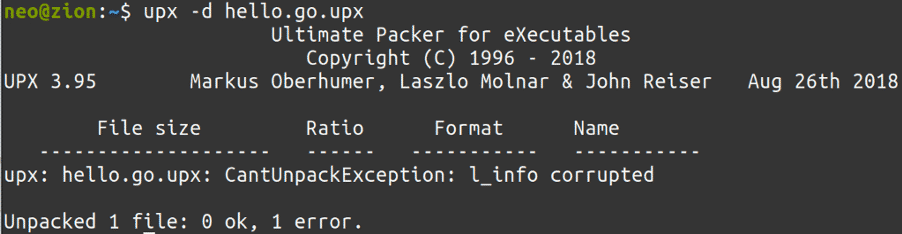
In order to understand what each of these corruption means, we need to dig further down and try to understand how the UPX header builds up after packing. We will find valuable information in the open source project’s source code, inside linux.h:
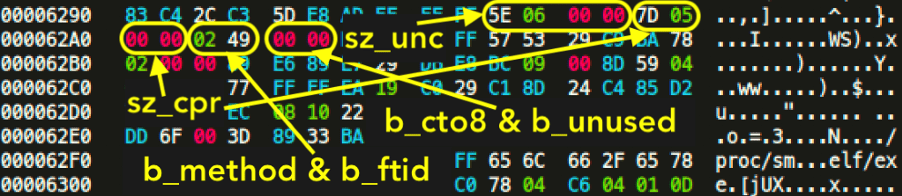
struct b_info // 12-byte header before each compressed block
{uint32_t sz_unc; // uncompressed_size
uint32_t sz_cpr; // compressed_size
unsigned char b_method; // compression algorithm
unsigned char b_ftid; // filter id
unsigned char b_cto8; // filter parameter
unsigned char b_unused; // unused};
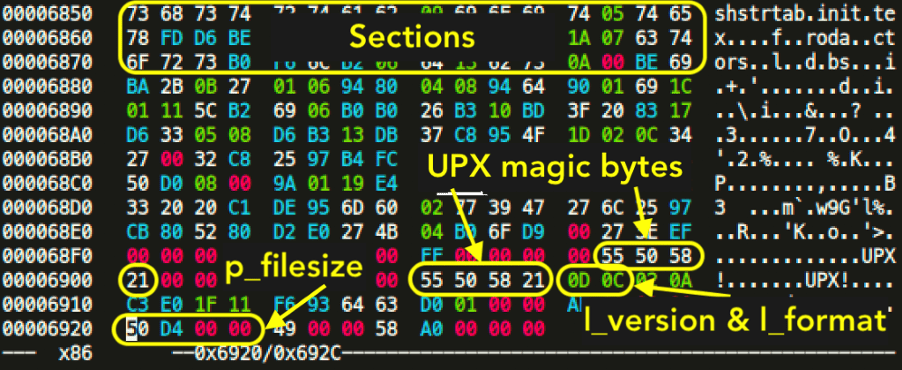
struct l_info // 12-byte trailer in header for loader (offset 116)
{uint32_t l_checksum; // checksum
uint32_t l_magic; // UPX! magic [55 50 58 21]
uint16_t l_lsize; // loader size
uint8_t l_version; // version info
uint8_t l_format; // UPX format};
struct p_info // 12-byte packed program header follows stub loader
{uint32_t p_progid; // program header id [00 00 00 00]
uint32_t p_filesize; // filesize [same as blocksize]
uint32_t p_blocksize; // blocksize [same as filesize]};
So, each of these structs store important information for the packer to work properly, so when the unpacking method is initiated, the target program is uncompressed as intended. If the corresponding hex values to these structs are altered, we will get the previously seen error messages.
Rundown
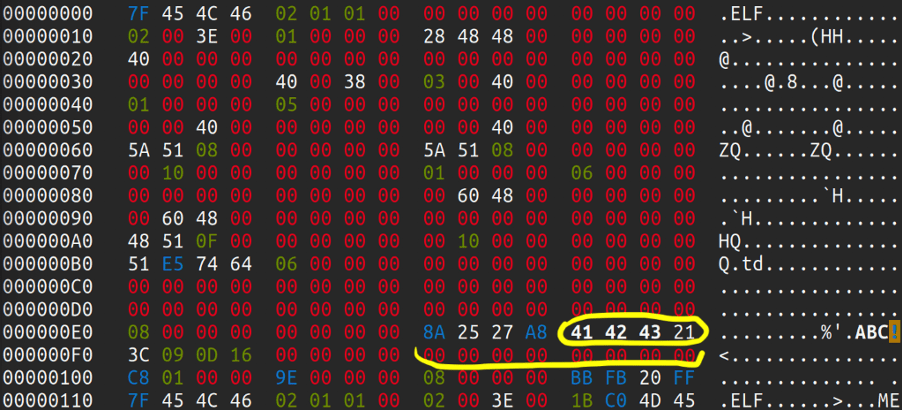
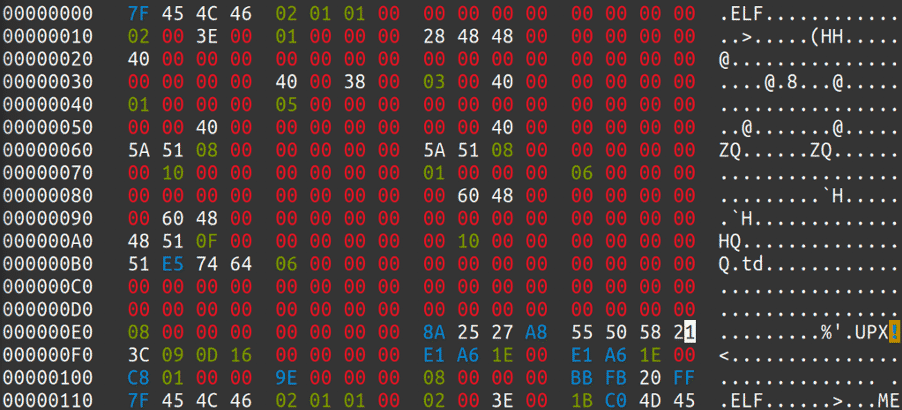
Now that we have an understanding how the fields and structures build up, let’s look at an example where UPX has been abused in some way or shape. Looking at the following hash:
bc88a57e1203f5eec08d34b59d9de43fa121f9d92cc773c17ebfbe848a2f88cd


We need to focus on the underlined hex values. The trained eye will immediately spot that at 0x98, the UPX! Magic header has been altered with the hex bytes of YTS. That is part of the l_info structure. If we go further and try to match the bytes with the previously shown code structure, it is clear that “20 08” is the loader size. 0D is the version info and 0C should be the UPX format. Right after l_info structure is the p_info structure at 0xA0. From the source code we know that p_progid should be “00 00 00 00″. After that comes p_filesize and p_blocksize, both storing the same size value, but in our case, it has been altered and erased. Fortunately, the value for the filesize and blocksize is also stored at 0x5C80, which is “58 B2 00 00”. We just need to put this value into p_filesize and p_blocksize. The values at these 3 offsets should always be the same. We also see in the trailer section that the string YTS appears twice. We also need to alter these back to UPX! (55 50 58 21). The trailer section also contains “0D 0C” again, which is the version and format info from the l_info.
We looked at l_info and p_info, but still have not touched b_info. Actually, there are two b_info structures in a UPX packed binary, one for the compressed target program and one for the compressed part of the loader itself.
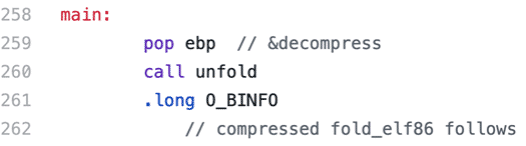
If we look inside i386-linux.elf-entry.S (ELF x86), we will find that the offset of the first struct b_info for the compressed program is given in .long O_BINFO. The other b_info for the compressed part of the loader, is located soon after the instruction call unfold near the label main:, reached from _start.
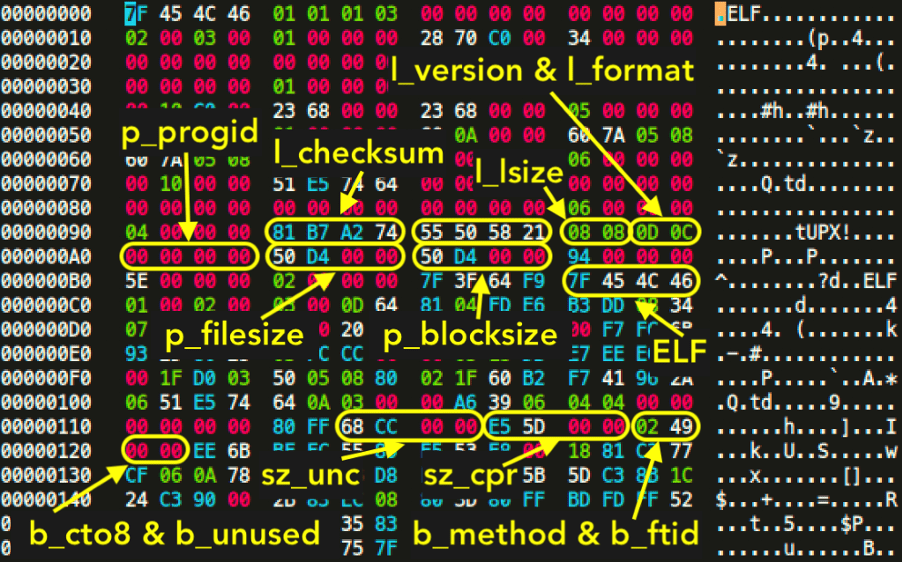
We can even debug the whole process and find the exact offsets by uncommenting the seen int3 instruction and recompiling the UPX binary. Once we debugged a sample file and found the offsets, we can make note of them and see the corresponding hex values:


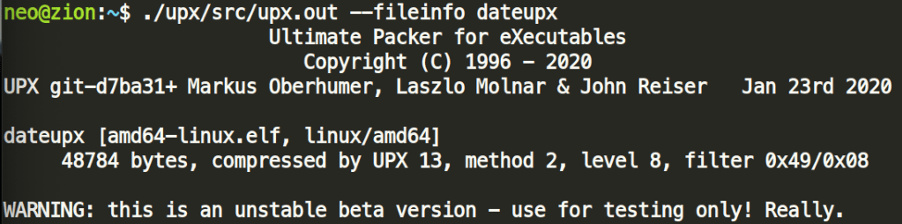
The b_method and the b_ftid must be the same for all b_info in the same file. There is a quick way to gain that information out of a binary, by running upx ––fileinfo on a sample, packed binary.
We have yet to see values for b_info being altered in the wild, but this might be another abuse surface for UPX packed binaries at later stages. Currently, the most prevalent UPX abuses are alteration of l_info and p_info.
Let’s summarize our findings of values for the structures in detail:
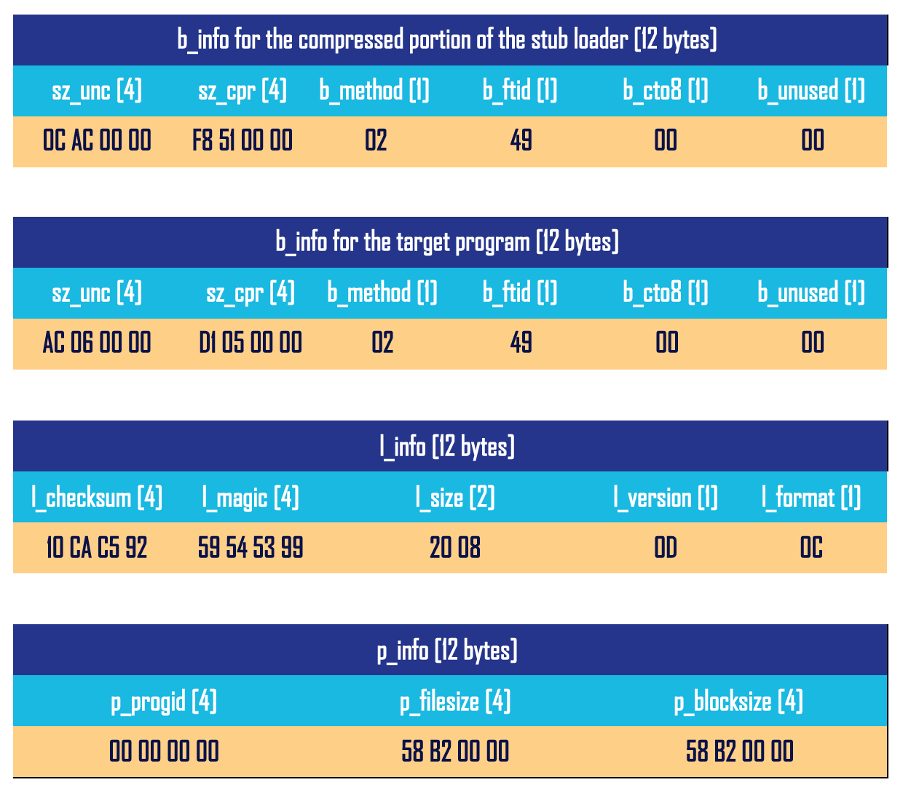
Once we put those in, our UPX packed binary now successfully unpacks.
Mozi
Let’s look at another example: Mozi is one of the prevalent IoT malware families in 2020. It is a perfect example for p_info alteration, as UPX packed Mozi binaries have been observed to come with 0 value of the p_filesize and p_blocksize fields. This will defeat automatic unpacking, and in order to get the unpacked binary, we would need to figure out the correct values of these fields. Employing what we learned previously we quickly find the corresponding filesize values in the trailer, and we can add that into p_info: “E1 A6 1E 00”
Manual Unpacking from radare2
Where the automatic unpacking does not work with upx –d tool, even after fixing all the mentioned discrepancies and modified fields, we may attempt to manually extract the unpacked executable image from memory, like the following:
Resources:
- https://github.com/upx/upx
- https://github.com/radareorg/radare2
- https://github.com/upx/upx/issues/389
- https://github.com/upx/upx/blob/master/src/stub/src/i386-linux.elf-entry.S
- https://github.com/upx/upx/blob/master/src/stub/src/amd64-linux.elf-entry.S
Appendix
Used malware hash for analysis:
bc88a57e1203f5eec08d34b59d9de43fa121f9d92cc773c17ebfbe848a2f88cd
Special thanks to @unixfreaxjp for his previous research on ELF packing.